Friday, February 17, 2012

Painting Day!

Today is the day we try not to get paint on the carpet get to paint the nursery! We're primed and taped and ready to roll. Here's a peek into what the room looks like currently:


The primer turned out to be pretty dark, which is good for us since we're painting the walls a fairly dark color. This will help with better coverage and will hopefully (fingers crossed) allow us to cover both walls with only half a gallon of paint. Since the other two walls are being painted a light grey, we opted not to prime them.

A few things I learned while taping the room:
  • Run a dust rag quickly over the base boards, window sills and anything else you're taping onto. This helps the tape stick better and won't create any gaps that might allow paint to come through.
  • It's easiest to work with smaller strips rather than keeping it on the roll. I tore off sections between 12 and 18 inches long and found it easier to keep a consistent straight line.
  • Tape over the outlets when you remove the plates...I'm guessing trying to clean paint out of those tiny holes isn't a party.
  • Don't bother trying to remove the plates from a phone jack outlet - the wires are connected to the plate (duh) and therefore it cannot be removed. I opted to OCD tape around the outlet cover, but you could probably free hand it pretty easily.
  • If you're 5'8" standing on a chair that's only 18" off the ground, you won't be able to tape the ceiling line of a room with 9' ceilings. Your husband will have to do this for you.
Charles only has one tip for priming/painting:
  • Regardless of your best intentions, you will inevitably come away covered in paint. So wear old clothes. Especially socks. And then take a shower :)
I'll hopefully be sharing finished pictures the next time I post! Then there are only about eight thousand other small projects to finish before the baby gets here. Happy Friday!

Wednesday, February 15, 2012

DIY Wedding Invitations

I hope your Valentine's Day was wonderful! Charles got up at some horridly early hour when it was still dark and ran and bought me four bouquets of assorted flowers that I was blessed to wake up to and then we exchanged cards over bowls of cereal :)


In honor of the holiday yesterday, I thought I'd share the invitations that I DIY'd in 2010 for our wedding! My inspiration came from a really old invitation catalog that my mom had; I unfortunately don't know where it went off to. I do remember that the original invitations were the same shape, had a black outer covering and were French themed.

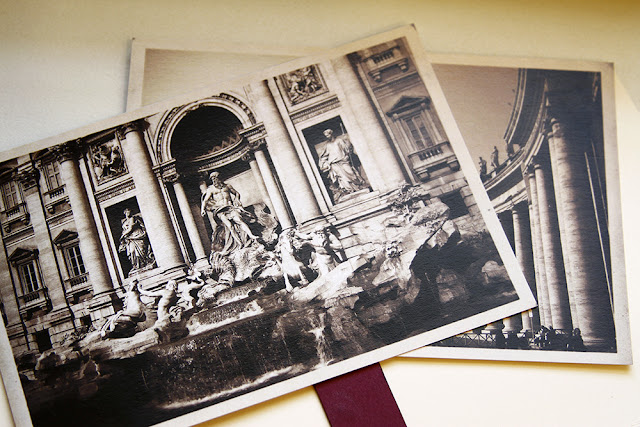
Charles and I met in Italy on a study abroad trip while we were both attending A&M, so it holds a pretty special place in both of our hearts. When we started planning the wedding I knew that I wanted to incorporate little bits of Italy into the decor and the invitations were one of the ways that I took advantage of the theme.

I liked the size/shape of the invites because they were unique to other wedding invitations I had seen and could fit into a standard size (4.125"x9.25") #10 envelope, which means there was more customization flexibility.

I went with a deep red for the envelopes, which I found online at Action Envelope. I picked the square flap in garnet and instead of paying to have the return address printed, I just set up a template in Word and did it on my home printer. That step alone saved me about $60 and it was super easy.


The invitation is a 9"x8" base that folds over into a 9"x4" card. Inside is the actual invitation part, attached to the lower half, and two postcards held by a red ribbon on the upper half.


I got all of these printed on 8.5"x11" card stock at Office Max and they did a fantastic job. The guy I worked with was very knowledgeable and a huge help. I chose off-white card stock for the outer bit, which remained plain on the inside and had a printed vintage map of Italy on the exterior that I bought off of iStock photo. The invitation part (8"x3") I created in Photoshop to look older, so I had those printed - 3 to a sheet - on regular white card stock. In a stroke of luck, the same company I bought the envelopes from also sold plain 80 lb card stock in coordinating colors, and - at 8.5"x11" - was the exact right width to give me a border around the invitation. All I had to do was cut it into 3.5" sections and I had an instant mat!


The postcards (5.75"x3.75") I also created in Photoshop out of two photos that I took during our semester in Italy. I manipulated them to resemble vintage Italian post cards and on the back they held more information for the wedding, including the RSVP that was pre-stamped and easy to drop in the mail.

For the exterior stamps, I used the King and Queen of Hearts set from the post office that I thought were adorable, went well enough with my vintage-y theme, and didn't scream wedding!
Things that were invaluable during this process:
The fonts that I used for the project were: Aquiline (for the return address, postcard details, and our names on the invite), DaunPenh (for the all-caps text on the invite & postcards), and Nasty (for the postcard headers).

I don't have a complete cost breakdown but I believe the overall cost was roughly $500, which brings it to about $5 per invitation, and that includes postage. So while it's certainly not the cheapest option out there, it was definitely less expensive than buying a completely customized invite from someone else, and I was able to include all of the information that I thought was important. No regrets!


In nursery news, my darling husband primed the two walls that we're painting the Plumage color on his day off on Monday, and we should have the rest of the room painted by the weekend...update to follow!

Monday, February 13, 2012

When DIY Plans Go Awry

This past week I had a short and purely hypothetical relationship with a dresser. I saw it for $25 on Craigslist and at first glance it wasn't anything to write home about, but it looked to be solid wood and in good condition. And after having stalked Craigslist for the past few months looking for something suitable to fix up for the nursery and not coming up with much, I sent off an email. This was around 10:00 at night, so I figured I wouldn't hear back until the next morning.


I was a little worried about the height of the dresser (31") but figured I'd make it work for $25. Then as the night went on, as I went to bed, as I woke up at 3:30 in the morning and couldn't get back to sleep, I started making big plans for this dresser. In fact we became great friends.

I already knew I'd paint it white, and then to save even more money I had the thought that instead of buying new pulls - like I always figured I would when I got around to this particular project - I'd spray paint the original ones black. Ooo. I liked that. Black classic pulls on a crisp white dresser.

And then I made my way back to the height issue. And the fact that I wasn't a total fan of the bit of scroll ornamentation at the bottom of the dresser. So at 3:30 in the morning I had a stroke of complete brilliance (because what thought at 3:30 in the morning isn't brilliant?). I could solve both problems at once with one simple solution: new legs. I realized that recently I had been drawn to pieces sporting tapered wooden legs/feet.

So in the middle of the night I sat in front of my computer, squinting (I had forgotten my glasses in the bedroom) and researched where I could buy individual feet for my new, beautiful, white-with-fresh-black-pulls dresser. And I found these beauties:


They came in a variety of different heights and I thought the six inch feet would work quite nicely - or, if needed, the eight inch feet. At around $7 per leg, they were affordable and deliciously modern.

By this point, since I was on a roll, I started brainstorming about that top drawer (it looks like 3 drawers, but it's really just one). I liked the little curve at the top in the middle and thought - what if I took that drawer out completely, installed a flat piece of wood on the bottom and instead used it as a shelf/cubby to hold a few shallow baskets or easy-to-reach diaper changing necessities? Brilliant! My vision was complete:


I went back to bed, finally able to shut up my brain, and woke up to this email:

"Thank you Jessica for your message, dresser sold yesterday"

Of course.

So now I'm back to stalking Craigslist.

Wednesday, February 8, 2012

I'm a Fan

So I have a confession to make. I'm not entirely sure that I'm allowed to paint in my apartment. Did that stop me from buying $70 worth of paint this weekend? Nope.

I say not entirely sure because I've never actually even asked, just on the off chance that the answer is no. I figure I'm in a better situation if complications arise and I can say "Oh really? I had no idea..." quite truthfully.

The way I justify it is this: I'm going to paint it back. And because I'm a perfectionist, it will probably look better than it did before. Just sayin'. I did ask if the apartment provides touch up paint, and they do, which means all I'll have to do is bring it to the store, color match it, and buy a couple of gallons. But that could be years down the road, so onward!

Garage sale-ing with my mom this weekend didn't reward us with a dresser (though there is a candidate at a resale shop in town, so stay tuned), but I did walk away with this:


We hit up four garage sales in the area and then on our way back home caught sight of a church having one as well, so we made a quick stop. It was easy to see once we got inside that they didn't have the type of furniture we were looking for, but we walked around for a minute anyway and I happened to pick up the fan deck. Lo and behold, it was for Mythic paint - the exact paint brand that we're using for the nursery. Why yes, I think I'll take you home with me.

According to the tag on the back, it was originally $26.00 (and the ones on the website now are $30.00) so I feel pretty good about picking this one up for 2 buckeroos. Even though I already had our color picked out for the nursery (Plumage, by Martha Stewart), I figured it was good to have because 1. In case they had trouble color matching in the store (they didn't), I would be able to find the closest match via swatches, 2. I could pick out a complementary gray in Mythic's own colors and not have to color match, and 3. For future painting endeavors, I'd have it on hand.

The next day Charles and I set out to get the rest of the supplies to start the nursery painting process. First off was the primer:

Low odor & Zero VOC

We went with the Olympic primer that Young House Love used when they painted their guest room the same dark blue color. The nice thing about tinted primer is that you don't need as many final coats of the actual paint. And since this stuff is only $16 a gallon (vs $44 for the paint), I'm happy to add it to the materials list.

Next up was the actual paint:


Like I said in the last post, we went with Mythic paint because it's non-toxic and zero VOC - even when they add in the color. So while it's about twice as expensive as regular paint, I'm happy with the choice since it's going in the nursery. Also, don't you just love their retro-esque branding?


We ended up getting two quarts of the Plumage accent color and two quarts of the gray - each one will be on two of the four walls in the room. We're leaving the ceiling alone, even though it's the same beige/off-white color the rest of the walls currently are. I don't think I have the stamina or the arm strength to mess with it...we just won't look up :)

We also picked up a few other supplies:


I was initially just going to ask around my various family members to borrow rollers, brushes and the like, but I figured if I'm going to be a real DIY-er, I need my own equipment. And at $9.97 for the ("$25 Value!") set, it wasn't exactly breaking the bank. Also added to the ranks: frog tape (so much better than blue painter's tape) and a "valved respirator" mask. Even though the paint is zero VOC and we'll be keeping the windows open for ventilation, I'll still feel better about wearing one of these bad boys.

The plan for this week is to clear out the remainder of the room, tape and prime and then early next week we'll tackle the painting.

Current cost breakdown:
  • Primer: $18
  • Painter set, frog tape & mask: $26
  • 4 Quarts of Mythic paint: $70
TOTAL: $114

So I'll be sure to post updates on our first major painting adventure...Any painting tips you'd like to share? :)