Showing posts with label Home Decor. Show all posts

Friday, May 25, 2012

The Long Awaited Dresser Post - Part 2

(Click here to read part 1)

So where were we? Oh yes, I believe we left off somewhere around here:

A hunk of burning dresser love
The dresser had been sanded and stained, leaving us with a gorgeous grain (seriously, look at it) and thismuch closer to a finished product.

The next step was to put on the top coat - the one part of the process that I was actually able to do myself. Cue the giddyness.Who has two thumbs and gets excited about applying sealer? This girl. The product I used is called Safecoat Acrylacq and it looks a little something like this:

At nearly $30 including shipping, it's not exactly a bargain but it had my vote for a couple of reasons. The first is that it's non toxic, low odor and low voc, which meant that I could apply it without worrying that my unborn child would sprout a last minute third arm (mission accomplished!). Secondly, it seals in any offgassing that might arise from the wood and stain, which makes me feel okay about putting it in the nursery. And thirdly, it comes highly recommended from Young House Love, my oft-referred to DIY blog resource. Also note my stylish respirator mask, left over from painting the nursery, which, combined with applying it in a well ventilated area, further protected my little man from any unwanted extra limbs. Yeah you're welcome, Harrison.


I ended up putting on three coats of the sealer, sanding lightly with fine steel wool in between each coat. The steel wool was able to sand down the tiny rough spots that popped up without taking off the sealer (it just dulled it down a bit), so it worked perfectly. After rubbing the surfaces quickly with the wool, I ran a damp cloth over everything to get rid of the dust and then applied my next coat of acrylacq, letting it cure overnight. Rinse and repeat.

Oooo shiny

Once the final coat cured, my step-dad loaded the bad boy up in his truck, hauled it up to our second floor apartment and now it sits all pretty-like in the nursery!


I have plans for the wall behind the dresser, hence the "in progress" label. While the dresser itself is finished the nursery isn't quite there yet. Here's the previous list I posted:
  • Set up the crib (my wonderful mother and step-dad got it for us and it should be in this week!)
  • Fix up the dresser (I finally found one...more on that soon!)
  • Finish the mobile
  • Possibly find a twin bed for guests/those late night visits to the nursery - however this might be a "Phase 2" project
  • Make/buy curtains
For now we're shelving the bed idea, but I also need to add:
  • Build book shelves (my next big project)
  • Hang up wall art
And now for more photos of the dresser, including a proper before and after:


It's hard to get across the exact coloration of the dresser, but the photo on the left below the "before" picture is probably the most accurate. It's a nice rich golden color and I love it.

Total cost breakdown:

Dresser: $43.30
Stain: Free (on hand)
Steel Wool: Free (on hand)
Paintbrush: Free (on hand)
Mask: Free (on hand)
Safecoat Acrylacq: $29.48

Total: $72.78

Thursday, May 3, 2012

The Long Awaited Dresser Post - Part 1

I'm a big fat liar... I believe it was in my March 6th post when I said that I'd be back later in the week with a dresser update. Admittedly things have been a little crazy, what with delivering a baby and what not. But let's put all of that behind us...and onto the dresser update reveal!

Well...not quite the reveal. That will be in Part 2. Liar again, I know. I'm workin' on it. In the meantime I'll be over here hanging with Jim Carrey.

So the dresser that we ended up buying was one that I had seen early on but at $60 was a little more than I was willing to pay at the time. Then after spending two weekends striking out at garage sales and Goodwills (not to mention the previous months of combing CraigsList all stalker-like), I decided to revisit the resale shop. It was closed. Sonofagun. Well not closed per se. The owner of that space was relocating to another part of the property and was supposed to be open again by the next weekend. He wasn't. But in a stroke of luck, another man on the property let us into the space because we were looking for a particular piece and were ready to buy. The best part was that I offered $40 and he agreed (this, friends, is what we refer to as a "steal"). So $43.30 later (yay tax), we had a dresser! Holy bananas I thought we'd never get there.

May I present to you: the before shot, even though we had already begun the sanding process.

The dresser was pretty scratched up, especially around the edges, and the finish on it was really dull, but I was drawn to the shape of it (I continually drool over the legs) and you can't beat that storage - currently every single drawer is full. It's a mid-century piece and I wish I knew its history, but we couldn't find a manufacturer/brand label, just this on the back:

Owosso is apparently a town in Michigan, but other than that I've got nothin'.

Luckily they stamped the word "dresser" on there, you know, in case we forget.

I was really excited about refinishing this dresser because I had never made over a piece of furniture before. One hiccup: I was pregnant. And even though I was ready to jump in (with protective face mask in hand), my parentals voiced their concerns, particularly with the sanding process. In the end we struck a compromise: I wouldn't take part in the sanding or staining, but I would get to finish things up by applying the top coat (which was non toxic & low VOC, but more on that later).

So in one afternoon my stepdad knocked out the sanding step and we were left with this bad boy (minus the feet, which he tackled later):

Poor thing is naked and here I am parading him on the internet. Tsk tsk.

I then had to decide on a stain. My original plan upon getting a dresser was going to be painting it stark white to go with the crib and the deep blue walls. However, because of the quality of this piece (dovetail joints!) and the detailed grain that was exposed after we sanded it down, I reversed my plan and decided to keep it au naturel.

I was initially drawn to the dark walnut (I'm not a fan of the blond stains or anything too light), but I was worried that it would be too dark. In the end I went with Early American, which ended up looking far and away better on the dresser than it did in the brochure. My stepdad had buckets of the stuff on hand, which was another bonus, so on went the Early American. Side note: who names these things?

We did one coat to start, which I thought would be too light, but ended up being perfect. Once the stain was on it was really easy to see just how beautiful the grain of the wood was. I'll save most of that for the next post, but here's a sneak peek...

Ooo la  la!


Tuesday, March 6, 2012

The Little Things

This weekend Charles and I ran a ton of errands we had been meaning to get to, which involved us trekking around to what felt like half the stores in Austin. The upside of our romp around town was that we ended up over by the nearest Crate & Barrel where I happened to have about $30 worth of store credit. That's like free money, yo! I love C&B but the sad thing is that I can only afford about 1/8th of what they offer on a regular basis, and thirty bucks doesn't go too far in the grand scheme of things. However, I had recently gotten their new catalog in the mail and a couple of their new kitchen towels caught my eye. I thought they'd be a great way to spice up the kitchen for Spring.

Our old towels are dark red & white striped cheapies from Walmart, so it was nice to bring a splash of color into the room along with some good ol' quality as well. The towels are huge - they're three times as long and wide as what you see above.

I love how with just a little change it can instantly brighten up a room or help you to pause and be thankful for all of the little things in life! You don't always have to do a renovation or complete overhaul of a space to look at it in a different light. 

I originally planned on only getting a couple of the Emily towels, but they only had one in the store and when I saw the Stock Pot towels in person I loved how they went together (and how different the textures were too), so I offset the one Emily style with two of the Stock Pot. I also threw in a Stock Pot Mitt for good measure.

 What changes are you making for Spring? I'll be back later this week with a dresser update!

Thursday, March 1, 2012

Let There Be Paint

We finally finished painting in the nursery. Can I hear a hallelujah?!


A special thanks to my lovely husband who primed the two blue walls and to my (also lovely) friend Heather who came over on her day off and helped me slap on the paint and stay motivated to finish. I love the way it turned out and was excited to discover that using a dark color didn't suddenly make the room look like the Batcave; in a way it actually makes it look a little brighter, go figure. I am glad that we chose to pair it with a light gray...I'm really liking how the two play off of each other.

Of course like any decent project, this one didn't go down without its hiccups, despite our best intentions. There was a little of this:

I won't name names, but this was caused by a certain male in the house.


And a little lot of that:


It turns out that, even when using frog tape, it's important to take the time and crease the seal with your nail or another firm object so that the paint doesn't bleed through. Duh. Once I discovered my oversight (which of course happened to the [dark] blue walls first), I made sure to take the extra time when taping for the gray walls, which paid off - I had no bleed through on those baseboards. So...user error, big time. And note to self: test things with the lighter paint next time!

Due to the fact that 1. I forgot to ask Charles to tape the ceiling on the two gray walls and 2. Heather and I were both far shorter than we needed to be to do the job ourselves, the gray walls looked like this for about a week:

...until I was able to borrow a step ladder from my parents and finish 'er up.

Also, a word about paint quantity. I undershot a bit lot on how much paint we would need. A full gallon of each color would have been great to have (remember, I only bought 2 quarts of each...), though it would have made things a little less interesting as there would have been a lot less nail biting and silent rants in my head. In the end, two quarts was just enough to do one coat plus touch-ups. Not exactly ideal. It actually worked out better for the blue walls (even though they were solid walls not broken up by doors or windows) because the primer didn't allow the walls to soak up as much paint, so we had more to play with. The gray walls, despite having one window and two large doors, used far more paint for the first coat and I was scraping the barrel to finish painting the "bald" spots. They're not perfect, but I got most of the obvious ones (and ignored some in the corner behind the door). My normally perfectionistic self is actually okay with it. Bring on parenthood! Ha.

One last tip that ended up being a quick and easy way to bring some freshness to the the room - the outlet plates. I took most of them off (except for the ones for the phone jack and cable) before we painted the walls and noticed how gross they were. Observe:

My camera does not adequately capture their grossness
They had paint caked on around the edges, who knows how many years of grime and were just overall lackluster. And against my crisp blue and gray walls, I wanted them to pop! So I washed them. It's amazing how easy paint comes off of plastic, especially with some soap, hot water and a rough sponge. And afterwards they were looking much better:

To the left: Grody McGroderson; To the right: Mr. Clean!
A quick and super easy fix...though be sure to let them dry completely before putting them back on so there's no accidental shock action.

So now that the painting is done we have to:
  • Set up the crib (my wonderful mother and step-dad got it for us and it should be in this week!)
  • Fix up the dresser (I finally found one...more on that soon!)
  • Finish the mobile
  • Possibly find a twin bed for guests/those late night visits to the nursery - however this might be a "Phase 2" project
  • Make/buy curtains
And a bunch of other little things that are escaping me. And we only have 5 1/2 weeks to go! Assuming the little guy doesn't decide to come early, which I'm starting to think he might just to throw a wrench into things :)

Friday, February 17, 2012

Painting Day!

Today is the day we try not to get paint on the carpet get to paint the nursery! We're primed and taped and ready to roll. Here's a peek into what the room looks like currently:


The primer turned out to be pretty dark, which is good for us since we're painting the walls a fairly dark color. This will help with better coverage and will hopefully (fingers crossed) allow us to cover both walls with only half a gallon of paint. Since the other two walls are being painted a light grey, we opted not to prime them.

A few things I learned while taping the room:
  • Run a dust rag quickly over the base boards, window sills and anything else you're taping onto. This helps the tape stick better and won't create any gaps that might allow paint to come through.
  • It's easiest to work with smaller strips rather than keeping it on the roll. I tore off sections between 12 and 18 inches long and found it easier to keep a consistent straight line.
  • Tape over the outlets when you remove the plates...I'm guessing trying to clean paint out of those tiny holes isn't a party.
  • Don't bother trying to remove the plates from a phone jack outlet - the wires are connected to the plate (duh) and therefore it cannot be removed. I opted to OCD tape around the outlet cover, but you could probably free hand it pretty easily.
  • If you're 5'8" standing on a chair that's only 18" off the ground, you won't be able to tape the ceiling line of a room with 9' ceilings. Your husband will have to do this for you.
Charles only has one tip for priming/painting:
  • Regardless of your best intentions, you will inevitably come away covered in paint. So wear old clothes. Especially socks. And then take a shower :)
I'll hopefully be sharing finished pictures the next time I post! Then there are only about eight thousand other small projects to finish before the baby gets here. Happy Friday!

Monday, February 13, 2012

When DIY Plans Go Awry

This past week I had a short and purely hypothetical relationship with a dresser. I saw it for $25 on Craigslist and at first glance it wasn't anything to write home about, but it looked to be solid wood and in good condition. And after having stalked Craigslist for the past few months looking for something suitable to fix up for the nursery and not coming up with much, I sent off an email. This was around 10:00 at night, so I figured I wouldn't hear back until the next morning.


I was a little worried about the height of the dresser (31") but figured I'd make it work for $25. Then as the night went on, as I went to bed, as I woke up at 3:30 in the morning and couldn't get back to sleep, I started making big plans for this dresser. In fact we became great friends.

I already knew I'd paint it white, and then to save even more money I had the thought that instead of buying new pulls - like I always figured I would when I got around to this particular project - I'd spray paint the original ones black. Ooo. I liked that. Black classic pulls on a crisp white dresser.

And then I made my way back to the height issue. And the fact that I wasn't a total fan of the bit of scroll ornamentation at the bottom of the dresser. So at 3:30 in the morning I had a stroke of complete brilliance (because what thought at 3:30 in the morning isn't brilliant?). I could solve both problems at once with one simple solution: new legs. I realized that recently I had been drawn to pieces sporting tapered wooden legs/feet.

So in the middle of the night I sat in front of my computer, squinting (I had forgotten my glasses in the bedroom) and researched where I could buy individual feet for my new, beautiful, white-with-fresh-black-pulls dresser. And I found these beauties:


They came in a variety of different heights and I thought the six inch feet would work quite nicely - or, if needed, the eight inch feet. At around $7 per leg, they were affordable and deliciously modern.

By this point, since I was on a roll, I started brainstorming about that top drawer (it looks like 3 drawers, but it's really just one). I liked the little curve at the top in the middle and thought - what if I took that drawer out completely, installed a flat piece of wood on the bottom and instead used it as a shelf/cubby to hold a few shallow baskets or easy-to-reach diaper changing necessities? Brilliant! My vision was complete:


I went back to bed, finally able to shut up my brain, and woke up to this email:

"Thank you Jessica for your message, dresser sold yesterday"

Of course.

So now I'm back to stalking Craigslist.

Wednesday, February 8, 2012

I'm a Fan

So I have a confession to make. I'm not entirely sure that I'm allowed to paint in my apartment. Did that stop me from buying $70 worth of paint this weekend? Nope.

I say not entirely sure because I've never actually even asked, just on the off chance that the answer is no. I figure I'm in a better situation if complications arise and I can say "Oh really? I had no idea..." quite truthfully.

The way I justify it is this: I'm going to paint it back. And because I'm a perfectionist, it will probably look better than it did before. Just sayin'. I did ask if the apartment provides touch up paint, and they do, which means all I'll have to do is bring it to the store, color match it, and buy a couple of gallons. But that could be years down the road, so onward!

Garage sale-ing with my mom this weekend didn't reward us with a dresser (though there is a candidate at a resale shop in town, so stay tuned), but I did walk away with this:


We hit up four garage sales in the area and then on our way back home caught sight of a church having one as well, so we made a quick stop. It was easy to see once we got inside that they didn't have the type of furniture we were looking for, but we walked around for a minute anyway and I happened to pick up the fan deck. Lo and behold, it was for Mythic paint - the exact paint brand that we're using for the nursery. Why yes, I think I'll take you home with me.

According to the tag on the back, it was originally $26.00 (and the ones on the website now are $30.00) so I feel pretty good about picking this one up for 2 buckeroos. Even though I already had our color picked out for the nursery (Plumage, by Martha Stewart), I figured it was good to have because 1. In case they had trouble color matching in the store (they didn't), I would be able to find the closest match via swatches, 2. I could pick out a complementary gray in Mythic's own colors and not have to color match, and 3. For future painting endeavors, I'd have it on hand.

The next day Charles and I set out to get the rest of the supplies to start the nursery painting process. First off was the primer:

Low odor & Zero VOC

We went with the Olympic primer that Young House Love used when they painted their guest room the same dark blue color. The nice thing about tinted primer is that you don't need as many final coats of the actual paint. And since this stuff is only $16 a gallon (vs $44 for the paint), I'm happy to add it to the materials list.

Next up was the actual paint:


Like I said in the last post, we went with Mythic paint because it's non-toxic and zero VOC - even when they add in the color. So while it's about twice as expensive as regular paint, I'm happy with the choice since it's going in the nursery. Also, don't you just love their retro-esque branding?


We ended up getting two quarts of the Plumage accent color and two quarts of the gray - each one will be on two of the four walls in the room. We're leaving the ceiling alone, even though it's the same beige/off-white color the rest of the walls currently are. I don't think I have the stamina or the arm strength to mess with it...we just won't look up :)

We also picked up a few other supplies:


I was initially just going to ask around my various family members to borrow rollers, brushes and the like, but I figured if I'm going to be a real DIY-er, I need my own equipment. And at $9.97 for the ("$25 Value!") set, it wasn't exactly breaking the bank. Also added to the ranks: frog tape (so much better than blue painter's tape) and a "valved respirator" mask. Even though the paint is zero VOC and we'll be keeping the windows open for ventilation, I'll still feel better about wearing one of these bad boys.

The plan for this week is to clear out the remainder of the room, tape and prime and then early next week we'll tackle the painting.

Current cost breakdown:
  • Primer: $18
  • Painter set, frog tape & mask: $26
  • 4 Quarts of Mythic paint: $70
TOTAL: $114

So I'll be sure to post updates on our first major painting adventure...Any painting tips you'd like to share? :)

Wednesday, December 7, 2011

It's Beginning to Look a Lot Like....Packing.

More than anything these days, I've been craving the scene of us decorating a tree, hanging garland & lights, sipping on hot chocolate and putting up those last decorations in our cozy apartment while Christmas tunes play in the background. Reality, however, looks a little more like this:


For some reason we signed a 15 month lease last October, which gave us the task of moving right smack in the middle of December. The smartest choice? Probably not. But hey, at least we're getting a bigger place (raise your hand if you'd like to raise a baby in a one bedroom, 600sqft apartment!) and I'm hoping that we'll get moved in and mostly unpacked in time for me to throw up a little Christmas cheer to enjoy before the holiday descends and then passes on all too quickly (did I mention it's my favorite holiday?).

For the past month and a half I've been pinning all sorts of holiday decor ideas and since I promised myself I wouldn't buy anything before we move in order to limit the amount of stuff we have to transfer from one apartment to another, these will have to tide me over for another week or two!


I absolutely love the wreath snowman and I can't wait until our little boy will be old enough to help decorate the tree! What are your decor plans for the holidays?

Photo credit: 1 2 3 4 5 6 7

Monday, November 7, 2011

Mugtails

Just when I thought I was getting way ahead of myself by wishing that the upcoming holidays would come just a bit sooner, I got my December issue of Real Simple magazine in the mail. Oh the glory. The gift ideas, the decor suggestions and 30 different kinds of holiday cookies, which to a pregnant lady sounds pretty flippin' awesome.

The thing that really caught my eye, however, was on the very first page of their gift suggestions for women. Maybe I'm a little late to the game, but I had never seen these before and I think they're precious. Enter: Mugtails.

Via

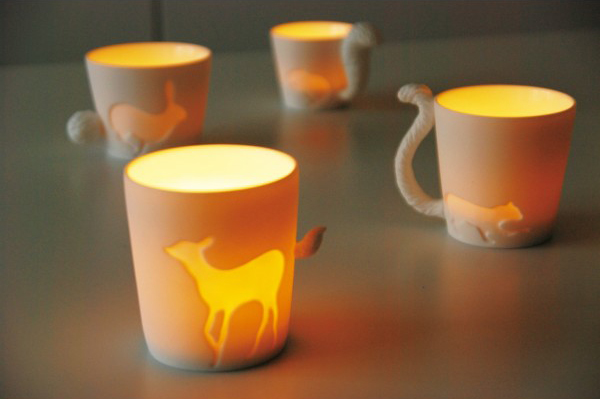
I think my favorite is a tie between the the dainty fawn tail and the over-sized rabbit tail. I wouldn't complain having the full set though, and at only $16 a pop, it's not completely out of the question (I was expecting $30+ each). I would see myself using them more in a decor setting than a practical, "use for my morning cup of coffee tea milk" situation, but either way they'd make an appreciated addition to our world.

Via
One thing the magazine didn't mention was that they not only serve as drink-of-your-choice receptacle, but also as a tea light holder. Since the animal shapes are thinner than the rest of the cup, they serve well as the focal point when the light shines behind, like so.

Via
These might just be going on my Christmas wish list. What do you think?

Thursday, November 3, 2011

Freshly Sharpened Pencils


Via Amazon
"Don't you love New York in the fall? It makes me wanna buy school supplies. I would send you a bouquet of newly sharpened pencils if I knew your name and address."  
                       - Joe Fox

I've always loved You've Got Mail, though I'm a sucker for any of Tom Hanks' older movies. I've also always had a thing for school supplies...I know better than to head down that aisle during August (or any time, really). So a few months ago when Fall should have been setting in, here in Texas we were still experiencing 100 degree days and I started pining away for cooler weather. When school started up and all I could see walking through the grocery store were pens and pencils and folders and highlighters, it made me think of that quote from the movie.

So I went out and bought a pack of pencils. For like a dollar.

Then I stole the mason jar that I had turned into a pin cushion jar awhile back and after tediously sharpening all 40-ish pencils (funnily enough, doing it by hand ended up being faster than using the old-n-busted electric sharpener), I shoved artfully arranged them in the jar!

Simple, cute, and now that we're actually starting to experience fall weather here in Central Texas, appropriate.


Has the changing seasons made you do anything crazy? Did anyone else watch You've Got Mail many times as a teenage girl?

Friday, July 22, 2011

Craigslist Finds

Every so often I like to browse the furniture category on my local Craigslist site without a real plan to buy anything (though my honest intentions do get me into trouble sometimes, when I find something I just have to have...I'll be posting about that in a bit). The hubs and I live in a one bedroom unit, which means 1. we have absolutely no extra room and 2. we can't afford many bonus purchases that don't really come with a legitimate use. However, I like to window shop because it allows my mind to wander and think of ways that I would refinish a certain piece and how I might decorate a room around it.

Lately my findings have been pretty poor, but today is just full of unique and fun things, so I thought I'd share! When I do a search, I usually put $50 or $100 as the max price, depending how I'm feeling that day, and click the "has image" box (because who, really, would buy a piece of furniture unseen? Why people continue to post their items without visual representation does not make sense to me....). And then I just see what turns up.
THE UNIQUE
Price: $40 (reduced)
I could see these sanded down and painted either a crisp white or some bold, fun color and placed next to a modern couch. They've very unique - it would definitely add something to your decor!


THE GOOD BONES
Price: $15
Looking through Craigslist can sometimes yield a bunch of junk, but you have to keep an eye out for things that might have good bones that could be refinished into a really cool piece. For $15, this nightstand is super cheap and it could make a really cute stand-alone table if refinished correctly. A fresh coat of paint, new drawer/cabinet pulls, and a cool replacement for that wicker (or not, if that's your thing!) could make this piece shine!


THE STEAL
via
This post is selling those two chairs and the table on the right for $25.00. Not each...together. Speaking of good bones, those chairs have a great structure and could easily be reupholstered. And that table is cute, it's round and it could easily go between the chairs as a great set. Just the thought of these three pieces, newly refinished and upholstered, sitting together in front of a wall of windows makes me want to get in my car and go get them. Not to mention it's maybe ten minutes from my apartment....must...resist!

So if you're in the Austin area looking for a project or just want some new (to you), unique furniture, visit the links below the images and have fun! And if you happen to buy the chairs and table, I will be forever jealous. :)

Have you found anything interesting on Craigslist lately?